© Cindy Dyer. All rights reserved.

© Cindy Dyer. All rights reserved.
I photographed several varieties of Creeping Phlox at Green Spring Gardens this afternoon. The rock garden in front of the Horticulture Center is ablaze in the colors of spring. The pink and white striped flowers are a Creeping Phlox called ‘Candy Stripe’ and were mixed in with white and solid pink blooms to create this pretty gradated effect.
© Cindy Dyer. All rights reserved.

Updated 8.04.2011. Originally posted July 2008. This is one of my top visited posts of all time with 17,948 visits on this blog and 32,476 visit on my gardening-only blog!
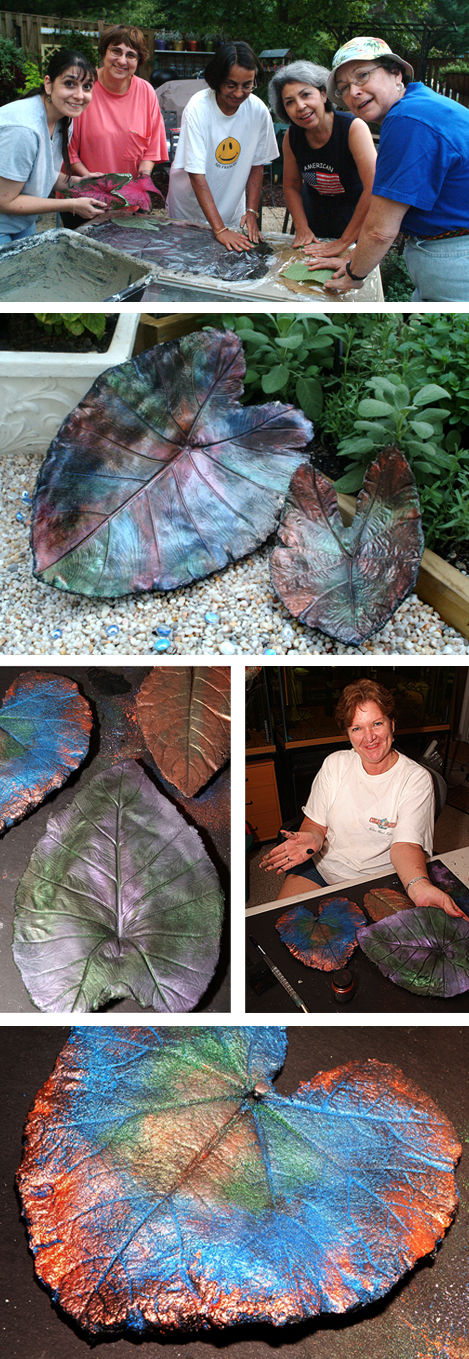
My friend Debbi and I have been making these concrete leaf castings for several years now, and my Garden Club members have also tried their hand at it. We have used Portland cement type 1 for our earlier creations, but then started making them with Quikrete instead. Several artists recommend using vinyl patch instead because it’s stronger, lighter in weight and picks up more detail from the leaf texture and veining. It’s also more resistant to flaking and cracking associated with traditional cement mixtures. The next batch I make will be with the vinyl patch product!
This site here has step-by-step instructions (plus a youtube video). The steps are the same no matter which product you’re using.
Click here for Craig Cramer’s blog posting, “The Secret to Great Leaf Casts.” He recommends using Quikrete. Click here for another site with an extensive gallery for inspiration. David, the artist, recommends waiting 30 days before painting your creations. (I’ve never waited that long—don’t know if I would have the patience!) He mixes Quikrete with his concrete mixture, but I’m not sure what the ratio is. At the very least, his photo gallery will endlessly inspire you!

Since most of the leaves we create are smaller, we don’t often do the chicken wire reinforcement. Larger elephant ears do require a bit of reinforcement, though, and we have made some of those (the larger the leaf is, the more likely you’ll need two people to move it when it’s dry!). Most of the ones we have done are made with leaves from hostas, pokeweed, grape leaves, caladium leaves, and smaller elephant ears. Leaves that have nice, deep veins work best. If you want to hang your leaf on a fence or wall, insert a curved piece of clothes hanger or thick wire (formed into a loop) into the back before the leaf is cured.
Artists Little and Lewis suggest using powdered pigments to color your concrete before creating the leaves. Read more about their approach with hosta leaves here. They have created some really beautiful (and large!) ones using Gunnera leaves, which grow well in the Pacific Northwest.
We haven’t tried the “color-in-the-concrete” approach yet. We do ours in the natural color and then paint after curing is done. Our favorite style is to paint the front and back with black acrylic paint, then rub on powdered metallic powdered pigments (the type often used in Sculpey jewelry projects). We used the Pearl Ex powdered pigment series, and we find silver, gold, bronze, blues, greens, and purples work much better than the pastel colors. We only apply the additional coloring and metallic powder to the front. The back remains black only. Check out Pearl Ex pigments on the Jacquard Products website.
I buy my Pearl Ex pigments from Michael’s or A.C. Moore. They sell them in sets of 12 different colors, or you can buy a larger bottle of one color. It doesn’t take much to cover the leaf. We use a soft cloth (and end up using our fingers) to rub in the pigments, which are very concentrated and go a long way. We find it best to paint the leaf with black acrylic craft paint in order for the metallic pigments to be intense in color when they are applied.
The metallic pigments are stunning and you can get a variegated look using various colors! If you try this style, you’ll need to seal the front of your leaf with an outdoor spray sealant to keep the pigment from rubbing off. I seal the front of the leaves with Krylon’s Make It Last!® Sealer, which has a satin finish and dries (for handling) within two hours.
Don’t expect the colors to hold up 100% in direct sunlight over a few years, though. The paint will chip a little but you can always paint over it and do it again to freshen it up. They still look good chipped and faded, though…sort of a shabby chic, relic-look! And you can try a new color scheme the next time around. Remember to seal after every repainting. Even if you hang or display yours indoors, you’ll still need to seal the pieces so they can be handled. And they certainly won’t fade as soon if they’re used as indoor art.
If you want a solid colored metallic leaf, you can use inexpensive acrylic craft paint instead of the powdered pigments. First, paint the front and back of the leaf solid black (the leaf is porous so it will soak in the black) and then paint the entire front with your colored metallic acrylic paint. After everything is thoroughly dry, seal the front of the leaf with the Krylon Sealer.
The good news: supplies for this project are CHEAP, CHEAP, CHEAP and the results are incredible! The downside? Those bags of Quickrete, etc. are HEAVY!
Whichever method you decide to try (Portland cement type 1, Quikrete, Quikrete + vinyl patch, vinyl patch only), I’d love to see your results and will share them on this blog!
© Cindy Dyer. All rights reserved.
I just got a new subscriber to this blog and found this posted on her blog. Thanks for the inspiration, Mjjazzy!
© Cindy Dyer. All rights reserved.

The ‘Lady Jane’ Tulips are in bloom in my front yard garden. This lovely blossom has a pink underside on each petal.
© Cindy Dyer. All rights reserved.


I interviewed fellow graphic designer, Daniel Scott, Jr., for our artist feature in the spring issue of Celebrate Home Magazine. I first interviewed Daniel on my blog two years ago. You can read that post here.
Daniel’s work is simply amazing! He creates these beautiful pop-art works of art with tiny slivers of product labels. Learn more about his work beginning on page 66 of the issue, which is free to download in the links below. He has beautiful prints available for purchase; see the store link on page 80.
The more clicks we get, the better we do with promoting and getting advertising! We thank you for your support.
Single pages version: Celebrate Home Spring 2013
Reader spreads version (my favorite!): Celebrate Home Spring 2013 Spreads
Order a print copy (at cost, plus shipping): http://www.magcloud.com/browse/issue/540569
You can also view it on issuu.com here.

Jam master Sophia Stadnyk shows you step-by-step how to make jam in our spring 2013 issue of Celebrate Home Magazine. Turn to page 36 to learn how. Then turn to page 42 for Barbara Kelley’s article, “Cooking with Jam,” where you’ll find (jam-packed!) recipes for an appetizer, entree and three sweet treats.
The more clicks we get, the better we do with promoting and getting advertising! We thank you for your support.
Single pages version: Celebrate Home Spring 2013
Reader spreads version (my favorite!): Celebrate Home Spring 2013 Spreads
Order a print copy (at cost, plus shipping): http://www.magcloud.com/browse/issue/540569
You can also view it on issuu.com here.
Written by Sophia Stadnyk. Photography © Cindy Dyer. All rights reserved.

The spring 2013 issue of Celebrate Home Magazine is now available for digital download. Click on either of the links below to download your FREE pdf copy of this issue.
This issue is jam-packed (and there’s even a jam-making feature!), so download today and get started reading.
The more clicks we get, the better we do with promoting and getting advertising! We thank you for your support.
Single pages version: Celebrate Home Spring 2013
Reader spreads version (my favorite!): Celebrate Home Spring 2013 Spreads
Order a print copy (at cost, plus shipping): http://www.magcloud.com/browse/issue/540569
You can also view it on issuu.com here.
On the cover: What says “spring” more than colorful tulips? I was photographing this bed of flowers and was standing on the edge of the wall when this little girl, clad in a princess skirt with sparkly shoes, came running around the corner. I got this one shot and she was gone. Serendipity!


Recent Comments