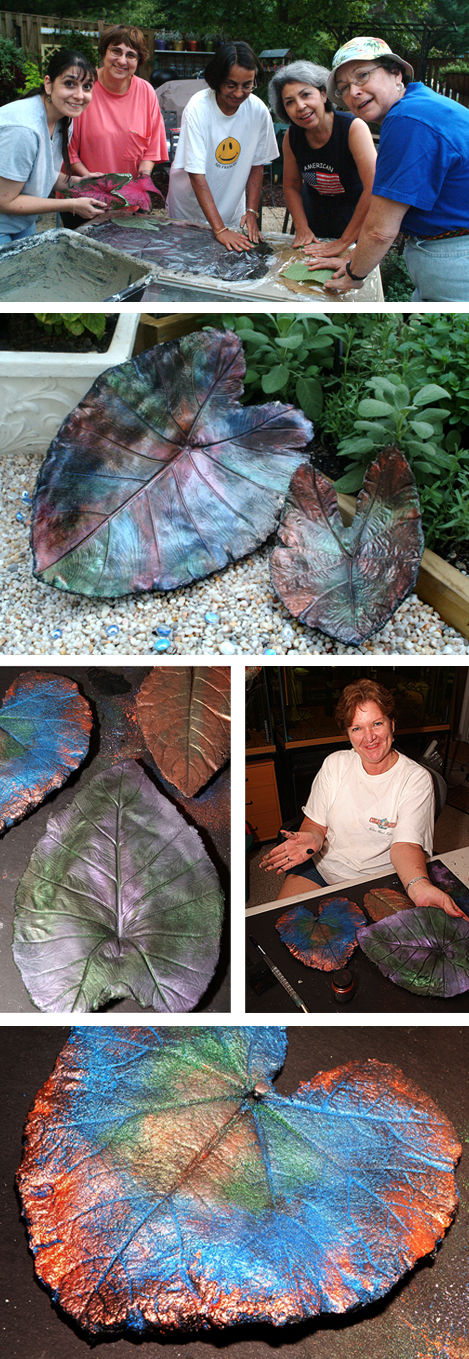
Debbi and I have been making these concrete leaf castings for several years now, and my Garden Club members have also tried their hand at it. There are many sites that show how to make them. This one has step-by-step instructions with photos: http://www.concretegardenleaves.com/concrete-leaf.htm
Since most of the leaves we create are smaller, we don’t often do the chicken wire reinforcement. Larger elephant ears do require a bit of reinforcement, though, and we have made some of those (the larger they are, the more likely you’ll need two people to move it when it’s dry!). Most of the ones we have done are made with leaves from hostas, pokeweed, grape leaves, caladium leaves, and smaller elephant ears. Leaves that have nice, deep veins work best. If you want to hang your leaf on a fence or wall, insert a curved piece of clothes hanger or thick wire (formed into a loop) into the back before the leaf is cured.
Artists Little and Lewis (http://www.littleandlewis.com/) suggest using powdered pigments to color your concrete before creating the leaves. Read more about their approach by going to www.marthastewart.com . Do a search for “concrete leaf casting” to find the segment where Little & Lewis discuss leaf casting and list supplies.
We haven’t tried the “color-in-the-concrete” approach yet. We do ours in the natural color and then paint after curing is done. Our favorite style is to paint the front and back with black acrylic paint, then rub on powdered metallic powdered pigments (the type often used in Sculpey jewelry projects). We used the Pearl Ex powdered pigment series, and we find silver, gold, bronze, blues, greens, and purples work much better than the pastel colors. We only apply the additional coloring and metallic powder to the front. The back remains black only.
This is the product we use: http://www.jacquardproducts.com/products/pearlex/sets.php.
I buy my pigments from Michael’s or A.C. Moore Craft Store. They sell them in sets of 12 different colors, or you can buy a larger bottle of one color. It doesn’t take much to cover the leaf. We use a soft cloth to rub in the pigments, which are very concentrated and go a long way. It is necessary to paint the leaf black (or a dark brown) in order for the metallic pigments to be intense in color.
If you try this style, you’ll need to seal your leaf with an outdoor spray sealant to keep the pigment from rubbing off. The metallic pigments are stunning! Don’t expect them to hold up 100% in direct sunlight over a few years, though. The paint will chip a little but you can always paint over it and do it again to freshen it up. They still look good chipped and faded, though…sort of a shabby chic, relic-look! And you can try a new color scheme the next time around. If you hang or display yours indoors, you’ll still need to seal the pieces so they can be handled. And they certainly won’t fade as soon if they’re used as indoor art.
Here’s another posting I found that lists supplies, steps, and shows leaves painted with acrylic or latex paint.
http://www.garden.org/regional/report/arch/inmygarden/2527
The good news: supplies for this project are CHEAP, CHEAP, CHEAP and the results are incredible! The downside? Those bags of cement/quickrete, etc. are HEAVY!
UPDATE: Thanks to Kim, a fellow garden blogger, for this link to Craig Cramer’s blog, “Ellis Hollow.” Check out his advice here: http://www.remarc.com/craig/?p=391
© Cindy Dyer. All rights reserved.


Recent Comments